In Getting start with a Team Explorer Plugin for VS 2013 Part 2 we created a Team Explorer Navigation Item and we will be using that item in this post and therefore assume that you have been through it already and created the navigation item.
Creating a Team Explorer Page
Add a new const to the GuidList class (in the Guids file) like below
public const string sampleTeamExplorerPage = "8C4F4A24-38C3-451C-A55F-9532EA61E841";
Create a class called SampleTeamExplorerPage and replace the contents with code below
namespace Company.TeamExplorerSamplePlugin
{
    using System;
    using System.ComponentModel;

    using Microsoft.TeamFoundation.Controls;

    [TeamExplorerPage(GuidList.sampleTeamExplorerPage)]
    public class SampleTeamExplorerPage : ITeamExplorerPage
    {
        private IServiceProvider serviceProvider;

        private bool isBusy;

        public void Cancel()
        {
        }

        public object GetExtensibilityService(Type serviceType)
        {
            return null;
        }

        public void Initialize(object sender, PageInitializeEventArgs e)
        {
            this.serviceProvider = e.ServiceProvider;
        }

        public bool IsBusy
        {
            get
            {
                return this.isBusy;
            }
            private set
            {
                this.isBusy = value;
                this.FirePropertyChanged("IsBusy");
            }
        }

        public void Loaded(object sender, PageLoadedEventArgs e)
        {
        }

        public object PageContent
        {
            get
            {
                return null;
            }
        }

        public void Refresh()
        {
        }

        public void SaveContext(object sender, PageSaveContextEventArgs e)
        {
        }

        public string Title
        {
            get
            {
                return "Sample Page";
            }
        }

        public void Dispose()
        {
        }

        public event PropertyChangedEventHandler PropertyChanged;

        private void FirePropertyChanged(string propertyName)
        {
            if (this.PropertyChanged != null)
            {
                this.PropertyChanged(this, new PropertyChangedEventArgs(propertyName));
            }
        }
    }
}
Note how we used the GuidList.sampleTeamExplorerPage guid string that we created in the TeamExplorerPage attribute. We also set some basic properties as in the previous post. Now that we have a page we will want to set the contents of the page
Creating Team Explorer Page Contents
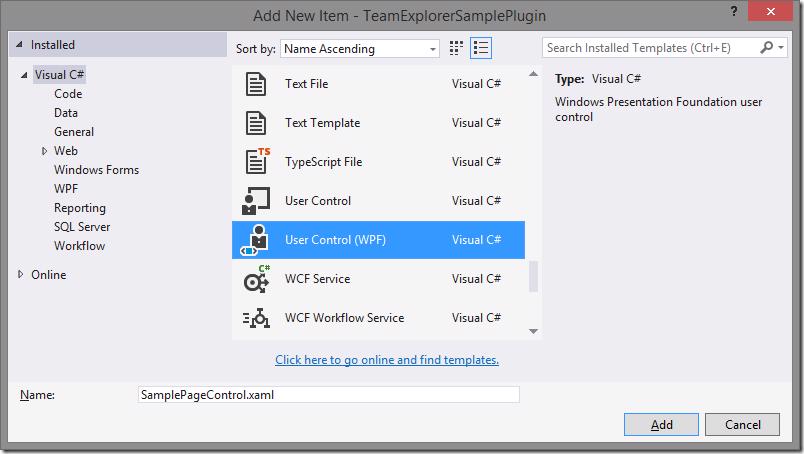
Add a new user control to your project called SamplePageControl.xaml
We will not be adding anything fancy to this control, just add a TextBlock and set the Text property so that we are able to see that it is loaded, below is a sample of this
<UserControl x:Class="Company.TeamExplorerSamplePlugin.SamplePageControl"
             xmlns="http://schemas.microsoft.com/winfx/2006/xaml/presentation"
             xmlns:x="http://schemas.microsoft.com/winfx/2006/xaml"
             xmlns:mc="http://schemas.openxmlformats.org/markup-compatibility/2006"
             xmlns:d="http://schemas.microsoft.com/expression/blend/2008"
             mc:Ignorable="d"
             d:DesignHeight="300" d:DesignWidth="300">
    <Grid>
        <TextBlock Text="Sample Page Content"></TextBlock>
    </Grid>
</UserControl>
You will at this stage need to add a reference to the assembly System.Xaml.
Defining the Team Explorer Page Content
To define the Team Explorer Page Content all we need to do is change the PageContent property to return an instance of our SampleTeamExplorerPage class
public object PageContent
{
    get
    {
        return new SamplePageControl();
    }
}
This will now load our new user control each time this page is loaded.
Navigating to a Team Explorer Page
All that is required to navigate to a Team Explorer Page is the guid of that page. To enable the navigation in our sample go to the SampleTeamExplorerNavigationItem class and change the Execute method to look like below
public void Execute()
{
    var service = this.GetService<ITeamExplorer>();
    if (service == null)
    {
        return;
    }
    service.NavigateToPage(new Guid(GuidList.sampleTeamExplorerPage), null);
}
You are also able to easily navigate to any other Page that is in Team Explorer if you know the guid, to make it easier to navigate to the default pages that are standards in TFS Microsoft has added a class called TeamExplorerPageIds which contains the Ids of all the default pages. For example if you wanted to navigate to the home page you would use the code below in your execute method or any other place
public void Execute()
{
    var service = this.GetService<ITeamExplorer>();
    if (service == null)
    {
        return;
    }
    service.NavigateToPage(new Guid(TeamExplorerPageIds.Home), null);
}
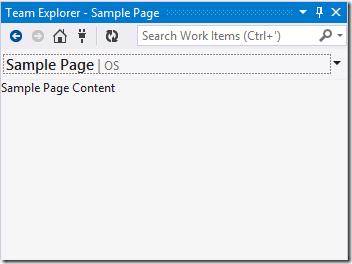
You'll notice now if you run the project that when you click on the sample button you are taken through to our new page and the page content is visible
That's all that was required to create a Team Explorer Page with Content .
In the Getting start with a Team Explorer Plugin for VS 2013 Part 4 we will be creating a new Team Explorer Section and then making some contents in the section content link through to this page.

